Choose File > Open..., then select the file or files, and click Open.
Alternatively, drag and drop the file(s) onto the app icon in the Dock or Finder.
Having a basic understanding of the file structure can be useful when working with edits.
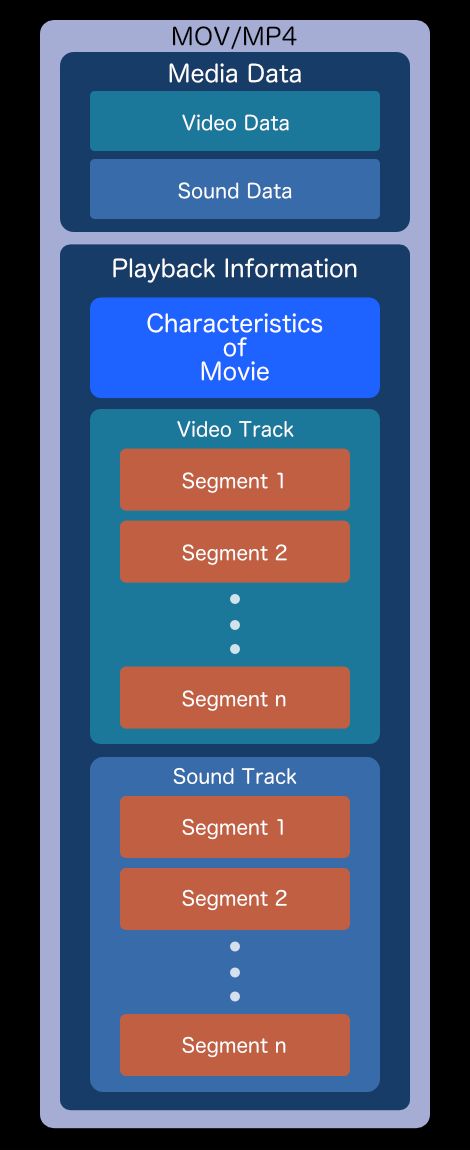
As shown in the diagram on the left, media data such as video and audio, and playback information are stored separately. Playback information is stored in tracks for each type of media.
Each track contains basic information such as time scale and language, as well as one or more track segments, which hold time-related playback information. (In most cases, a track contains only one track segment.)
Media players read track segments in order and play the content according to the information they contain.
A track segment includes:
• Playback start time (where playback begins within the media data)
• Playback duration
• Playback speed
It is possible to set an empty track segment that plays nothing, but the last track segment cannot be empty.
AV Sync Fix corrects time-related information in track segments to fix audio and video that are out of sync.
NOTE
Media players are supposed to play videos according to the track segments, but some non-Apple players (other than apps like QuickTime Player or Music) may ignore them.
In MOV, MP4, and M4V files, time is recorded using two integers.
These two values are related as numerator and denominator: the denominator is called the Time Scale, and the numerator is called the Time Value.
For example, if the Time Value is 638472 and the Time Scale is 600,
the calculation is 638472 ÷ 600 seconds, which equals 17 minutes, 44 seconds, and 72/600 seconds.
In AV Sync Fix’s time editing fields, this is displayed as 00:17:44.072.
Note, however, that the fractional part .072 means “72/600 seconds”, not “72/1000 seconds”.
If the Time Scale is 1000, the fraction matches milliseconds, but most files use a different Time Scale.
When editing hours, minutes, or seconds in AV Sync Fix, you don’t need to be concerned with the Time Scale.
However, when editing fractions of a second, you must take the Time Scale into account.
Since the Time Scale defines the number of Time Values per second:
• With a Time Scale of 600, the fractional range is .000 ~ .599
• With a Time Scale of 2997, the fractional range is .0000 ~ .2996
For instance, entering 0.5 seconds corresponds to:
• .300 at Time Scale 600
• .1498 or .1499 at Time Scale 2997
With odd Time Scale values like 2997, it’s impossible to represent exactly 0.5 seconds.
For editing and displaying times below one second, AV Sync Fix uses the actual units defined by the Time Scale. Compared to the more intuitive millisecond representation, this may seem a bit cumbersome. However, working in milliseconds would require converting from Time Scale values, and such conversion can introduce rounding errors, resulting in slight deviations from what the user intended.
The Time Scale value cannot be changed.
MOV and MP4 have two types of Time Scale. They can be the same or different.
- Movie Time Scale
There is only one Movie Time Scale in a file. It provides the overall time management for the file. - Media Time Scale
Each type of media data has its own unique Media Time Scale. It is usually related to the video’s frame rate or the audio’s sample rate. Only the “Media Start” adjustment is made in this unit.
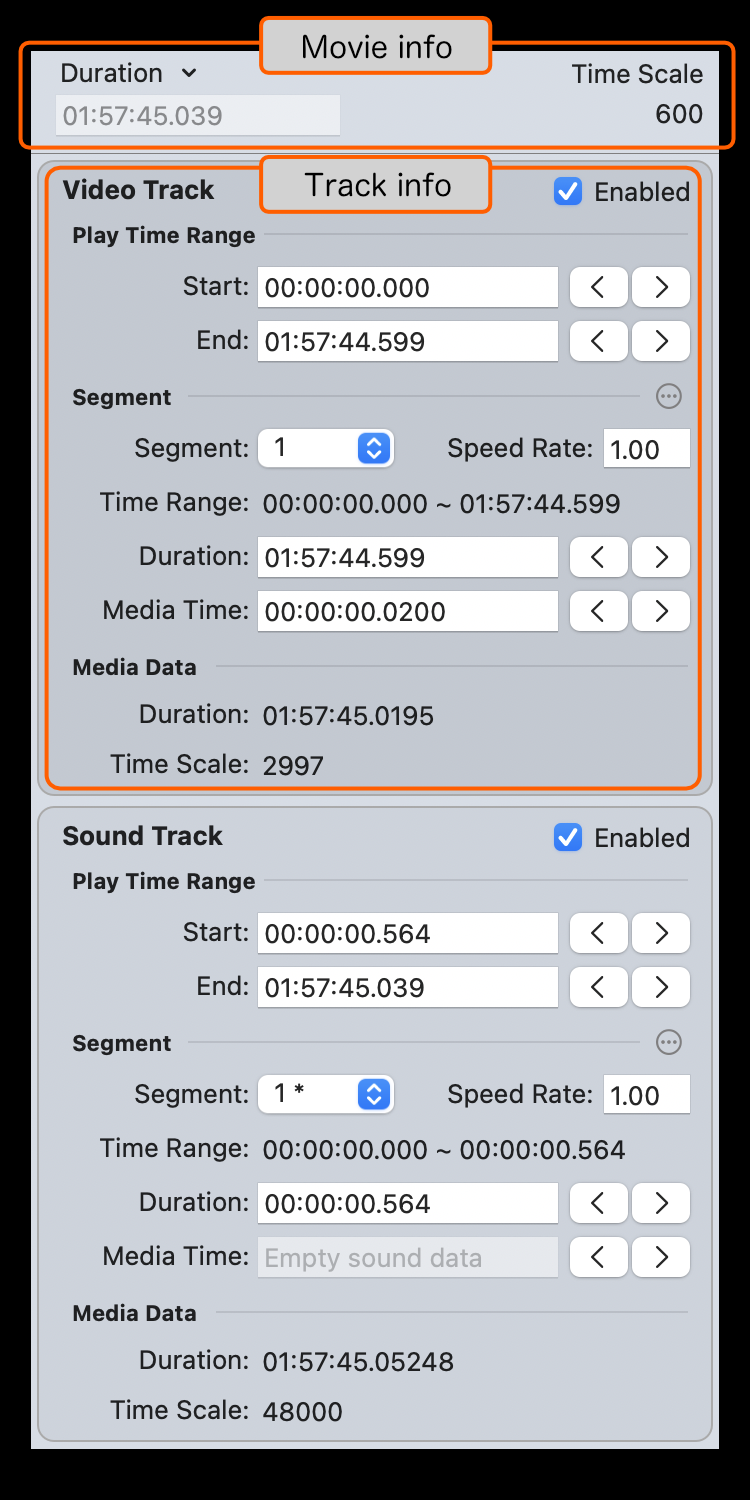
Movie Info
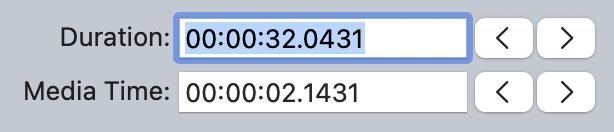
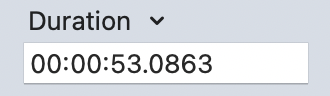
- Duration:
The total playback time of the movie. You can change this value freely, but it is usually set to match the longest track duration.
Editing Movie File Duration - Time Scale:
The Movie Time Scale, which defines the overall time management for the file.
All timing is managed in this unit, except for "Media Start", which uses the Media Time Scale.
Track Info
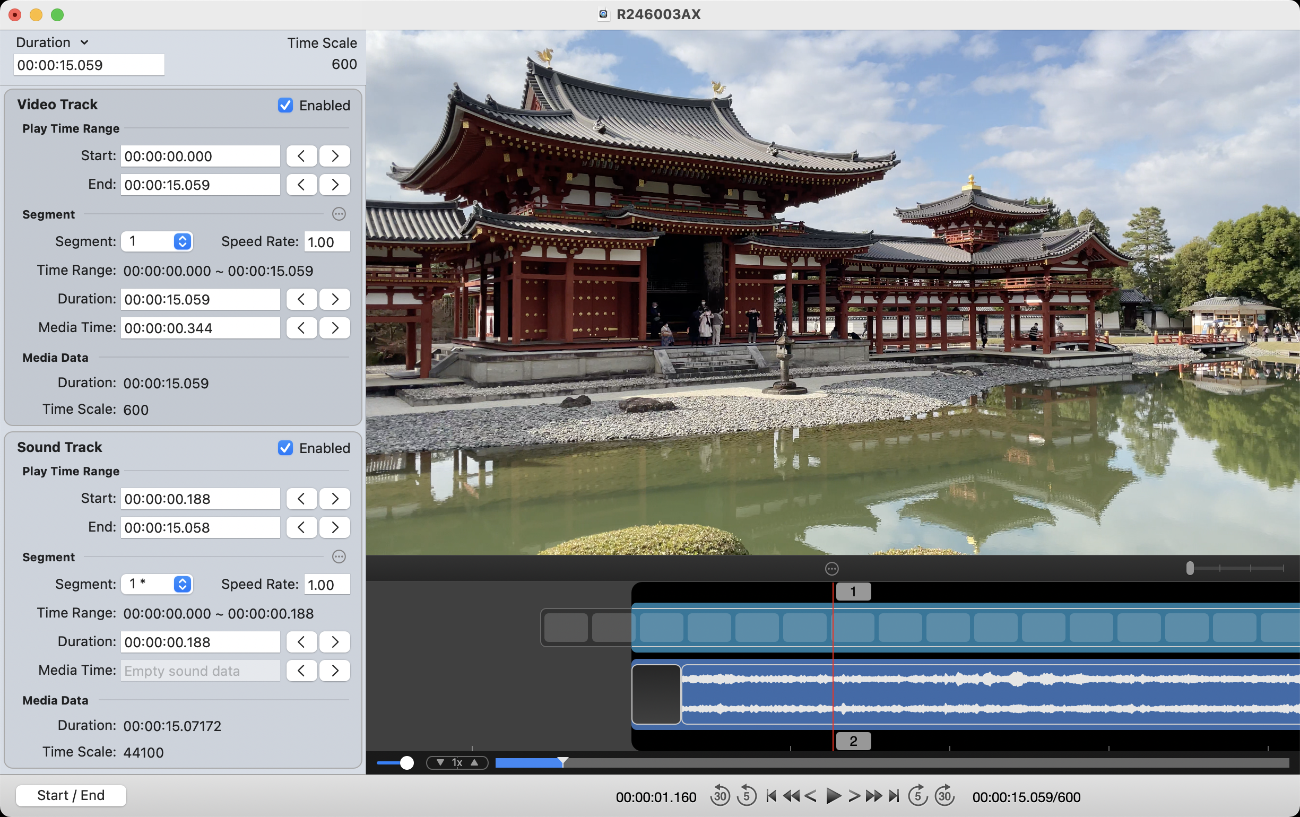
- Track Playback Range:
- Start:
The entered time represents the playback delay, realized by inserting an empty segment up to that time. - End:
The entered time represents the playback stop point, with the last segment’s duration adjusted accordingly.
- Start:
- Segment:
- Segment:
Select the segment to edit. Segments marked with “*” are empty segments. - Speed Rate:
Sets the playback speed of the segment. Most players other than Apple’s do not support this, so settings other than 1.00 are not recommended. - Playback Range:
The playback range of the selected segment. - Duration:
The duration of time the segment plays the media data.
- If you change the duration of the last segment, the overall track duration will also change.
- If you change any other segment, the next segment’s duration will be stretched or shrunk, so the total track duration remains unchanged.
- If you press the shift + return keys to confirm the edit, the next segment will not be stretched or shrunk, and the track duration will change.
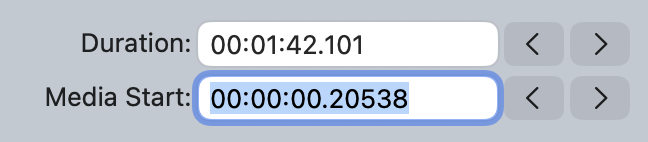
- Media Start:
The position (time) in the recorded media where playback begins.
The time is based on the Media Time Scale.
- Segment:
- Media Data:
- Duration:
The total playback duration of the media recorded in the file. - Time Scale:
The media time scale. Used only when editing "Media Start".
- Duration:
Combinations of modifier keys with the "<" and ">" buttons:
- command: decrease or increase the time value by 10
- option: decrease or increase the time value by 100
- control: decrease or increase the time value by 1000
- shift: decrease or increase by 1 second
In the timeline, you can adjust the timing by dragging tracks directly left or right.
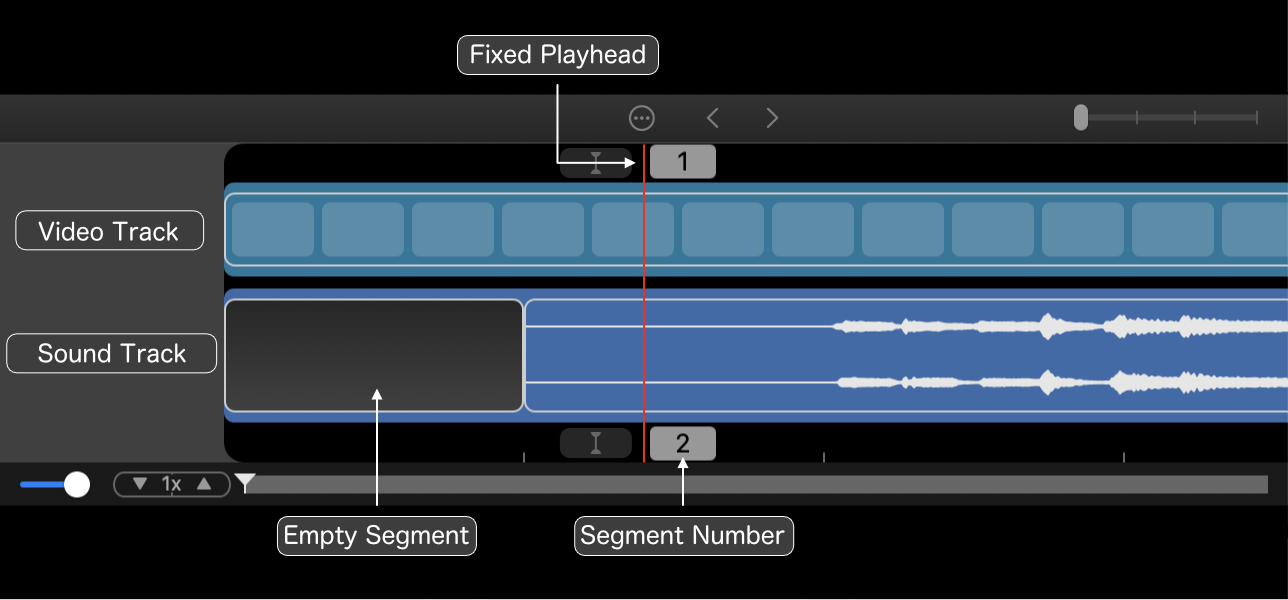
- Fixed Playhead:
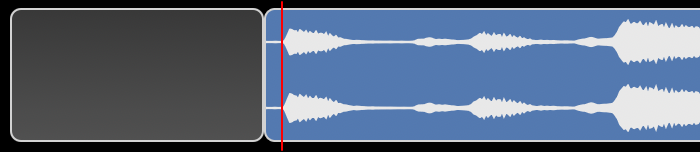
The red vertical line at the center of the timeline. Indicates the current playback position. - Empty Segment:
A segment without video or audio. If placed at the beginning of a track, its playback duration determines the track’s delayed start time. - Segment Number:
The number of the segment at the fixed playhead.
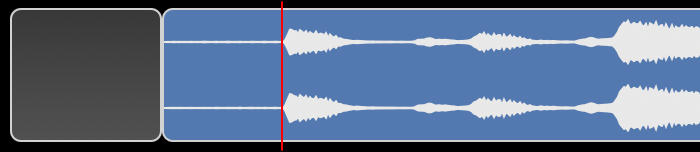
Dragging a track (segment) left or right adjusts its "Media Start".
To adjust multiple segments at once, hold the command key and select the desired segments, then drag while holding the command key.
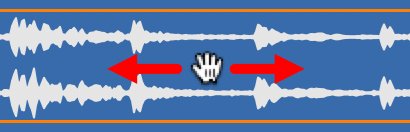
Dragging adjusts the "Media Start" but does not affect the segment’s Playback Range.
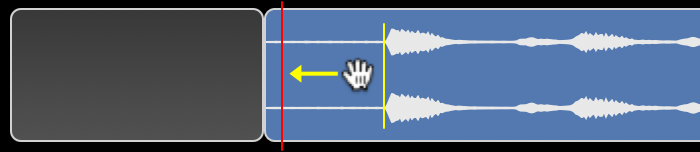
shift key + Drag:
Dragging while holding the shift key adjusts the "Duration" of both the dragged segment and the previous segment, instead of the "Media Start". The end time of the dragged segment remains unchanged.
Dragging the border between segments adjusts the "Duration" of the previous and next segments.
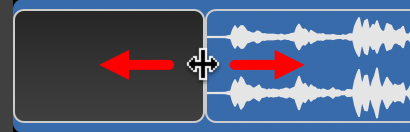
Dragging the border increases or decreases the durations of the previous and next segments, so the overall track duration remains unchanged.


shift key + Drag:
Dragging while holding the shift key does not increase or decrease the duration of the next segment, so the overall track duration changes.

You find matching points on each track and place marks. Clicking Align Markers then adjusts the "Media Start" so that the two marks are aligned.
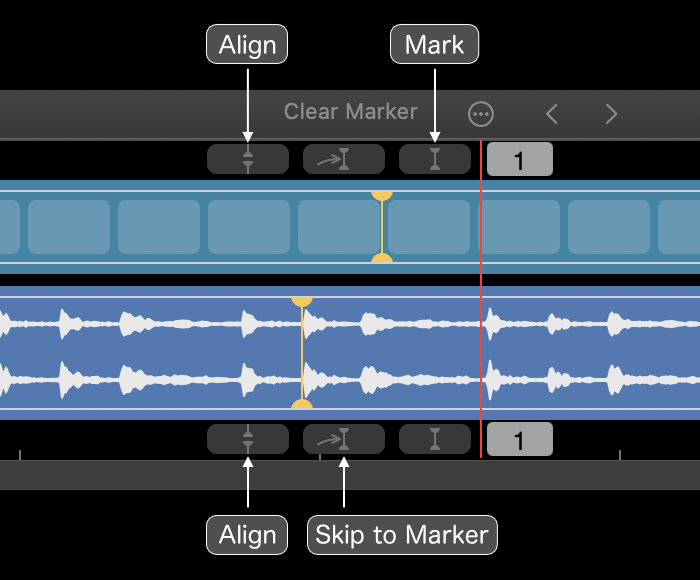
- Mark:
Places a marker at the time indicated by the fixed playhead. - Align Markers:
Adjusts the "Media Start" so that the markers on the video and audio tracks align.
The "Media Start" of the segment on the side where you clicked will be adjusted. - Jump to Marker:
Moves the playback time to the marked time.
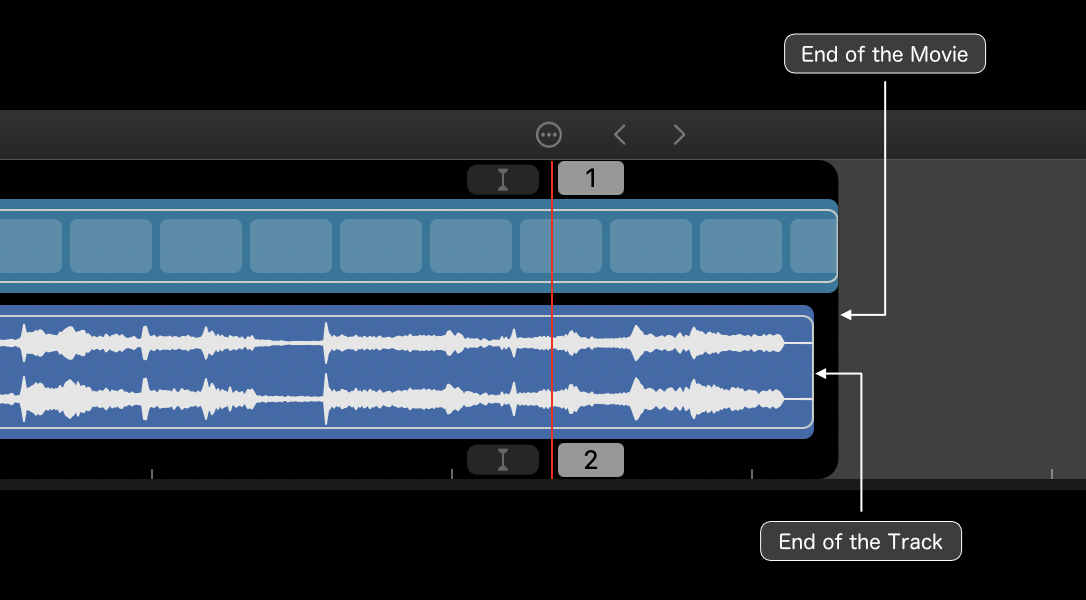
The video’s playback duration is typically matched to the track with the longest playback time, as shown below.
You can set any desired playback duration in the "Duration" field.
From the "Duration" menu, you can choose from the available track durations.
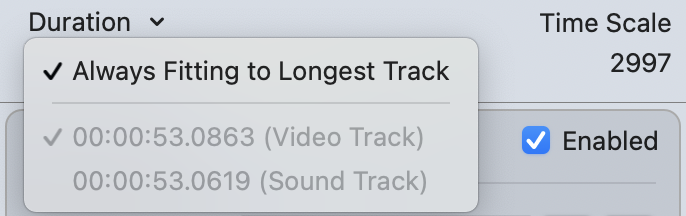
• Always Use Longest Track Duration:
When this option is selected, the video file’s playback duration is automatically adjusted to follow any changes in the track durations.
To manually choose from track durations or enter a custom value in the "Duration" field, deselect this option.
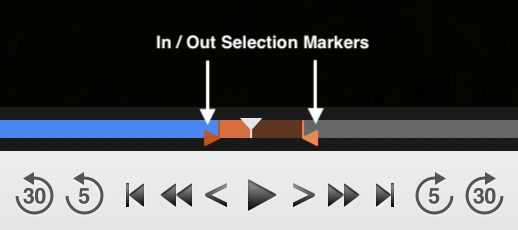
To select a portion of the movie, choose Controls > Play Selection Only to display the In and Out selection markers on the time bar. Drag the markers to define the selection. To fine-tune the selection, click a marker to select it, then use the left or right arrow key to adjust its position.
Choose Controls > Clear Selection to remove the selection range. Both the In and Out selection markers will move to the current playback header position, leaving no selection.
| Space bar or return | Play / Pause |
| command (⌘) + ↑ | Go to the beginning |
| command (⌘) + ↓ | Go to the end |
| option (⌥) + command (⌘) + ↑ | Go to the selection start |
| option (⌥) + command (⌘) + ↓ | Go to the selection end |
| ← | Go back one frame |
| → | Go forward one frame |
| command (⌘) + ← | Go back 5 seconds (Default) |
| command (⌘) + → | Go forward 5 seconds (Default) |
| option (⌥) + command (⌘) + ← | Go back 30 seconds (Default) |
| option (⌥) + command (⌘) + → | Go forward 30 seconds (Default) |
| option (⌥) + ← | Go back 1 second (Default) |
| option (⌥) + → | Go forward 1 second (Default) |
| control (⌃) + option (⌥) + ← | Go back 0.5 seconds (Default) |
| control (⌃) + option (⌥) + → | Go forward 0.5 seconds (Default) |
| J | Decrease playback speed |
| K | Normal playback speed |
| L | Increase playback speed |
| M | Reverse play |
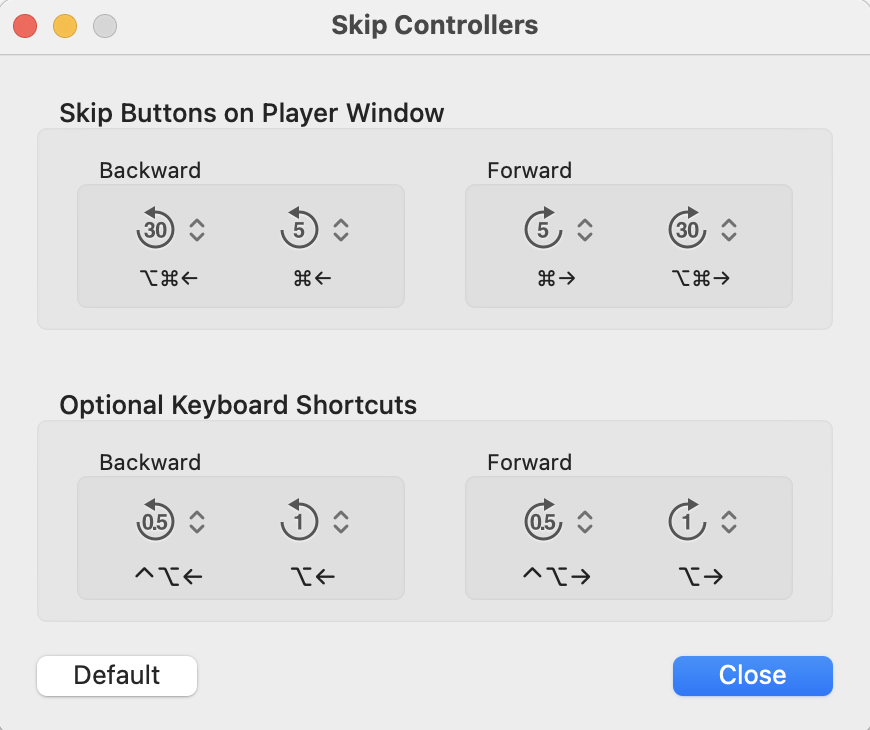
Choose Controls > Customize Skip Times… to open the Skip Controllers window.
You can choose from 0.5, 1, 3, 5, 10, 15, 20, or 30 seconds.