Sample Movie [Download]
Choose File > Open..., then select the file or files, and click Open.
Alternatively, drag and drop the file(s) onto the app icon in the Dock or Finder.
Add a subtitle track to store subtitle data.
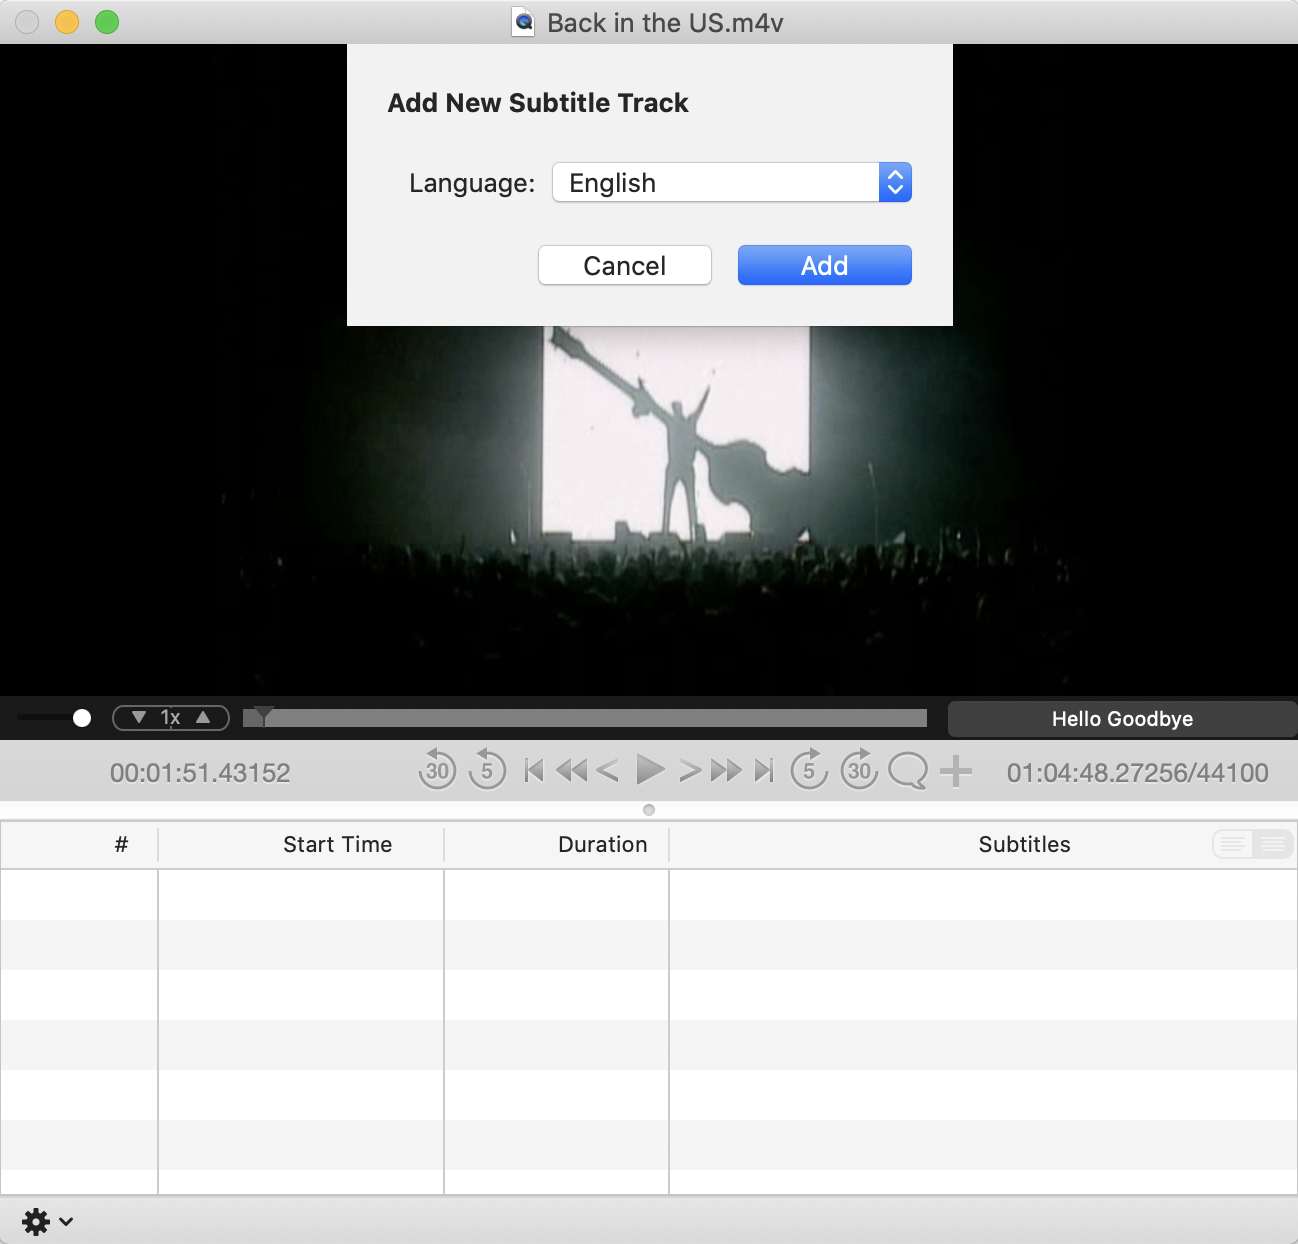
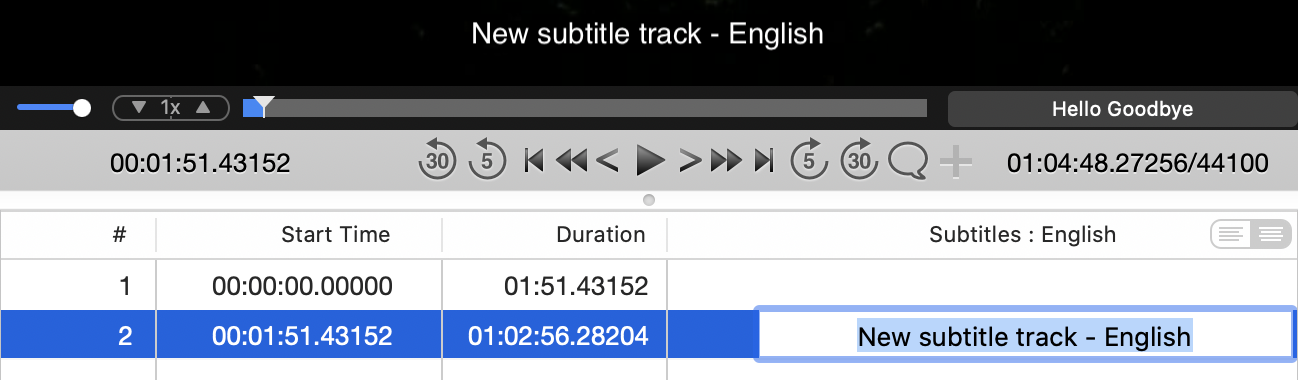
From the menu, choose Subtitles > New Subtitle Track..., then choose the language for the track in the sheet that appears. When you click the Add button, a new subtitle track will be added with temporary placeholder text, spanning from the current playback time to the end of the video.
You can edit the text by double-clicking it and entering your changes directly.
To insert a line break, press the “option” + “return” keys
Move the playhead to the time where you want to insert the subtitle, then choose Subtitles > Insert Subtitle.
The inserted subtitle will remain visible until the next subtitle appears. If there is no next subtitle, it will remain visible until the end of the video, or until the end time of the subtitle track if one is set.
Each subtitles appear until the next subtitle comes in. And the last one appear until the end time of the own track. If you do not want to stay a subtitle on the screen until the next or the end time, insert an empty text subtitle at the time to disappear that.
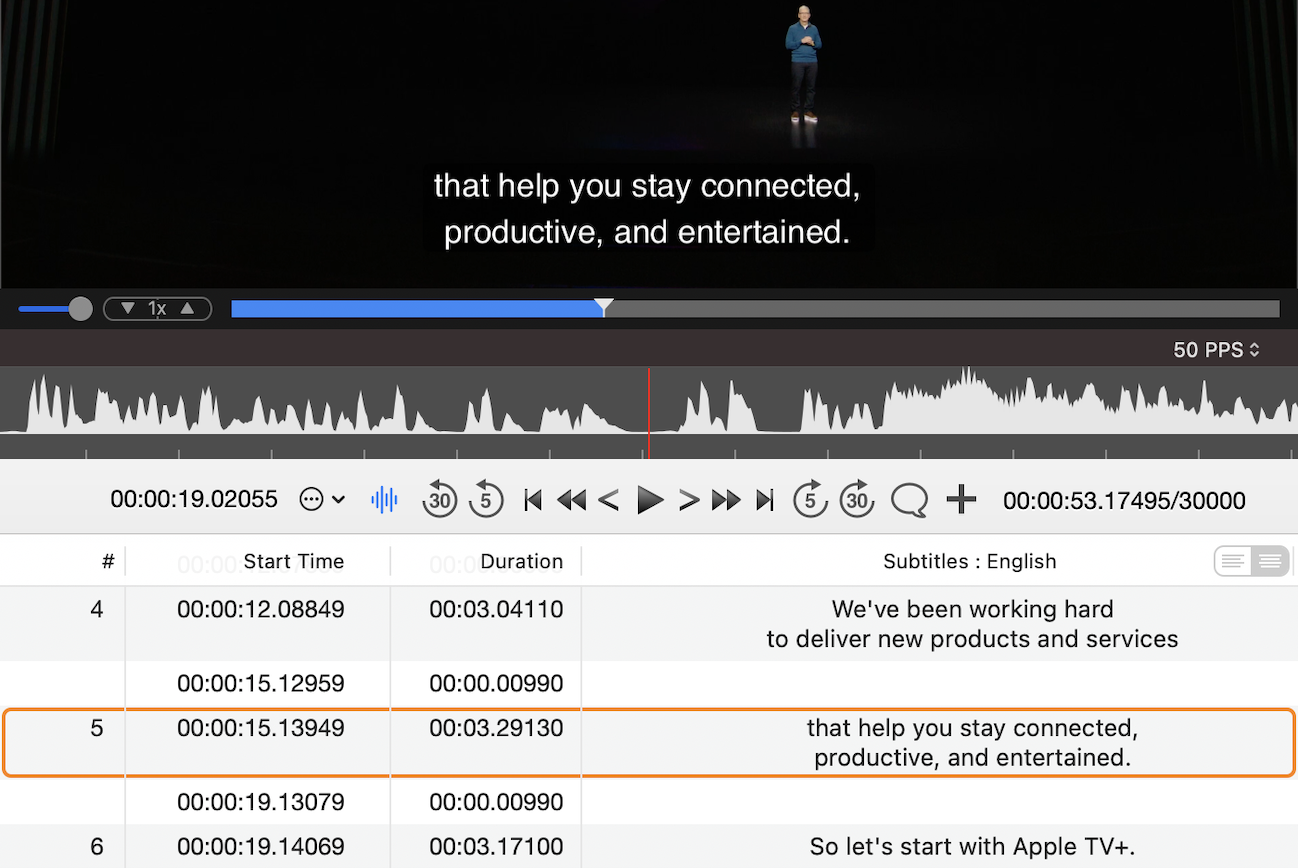
Each subtitle remains on screen until the next one appears. If you want to insert a gap between two subtitles, add a subtitle with no text.
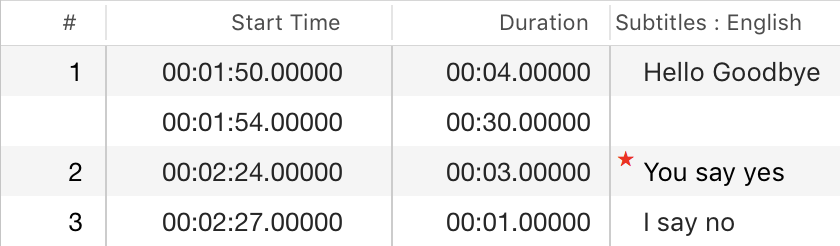
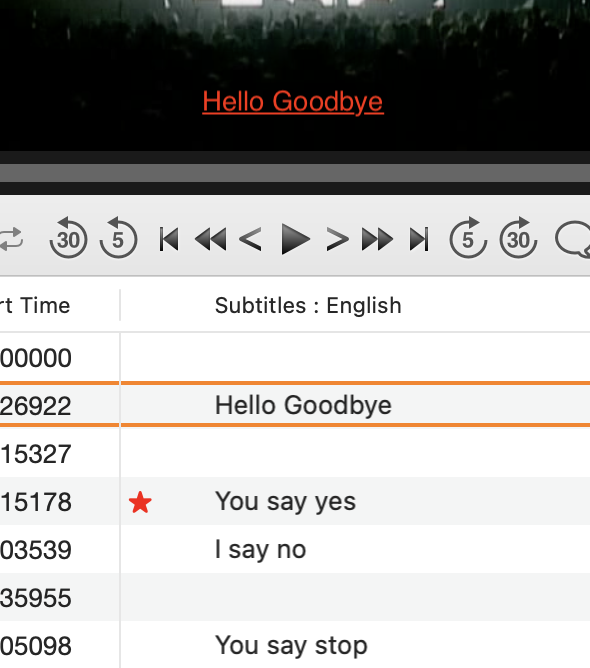
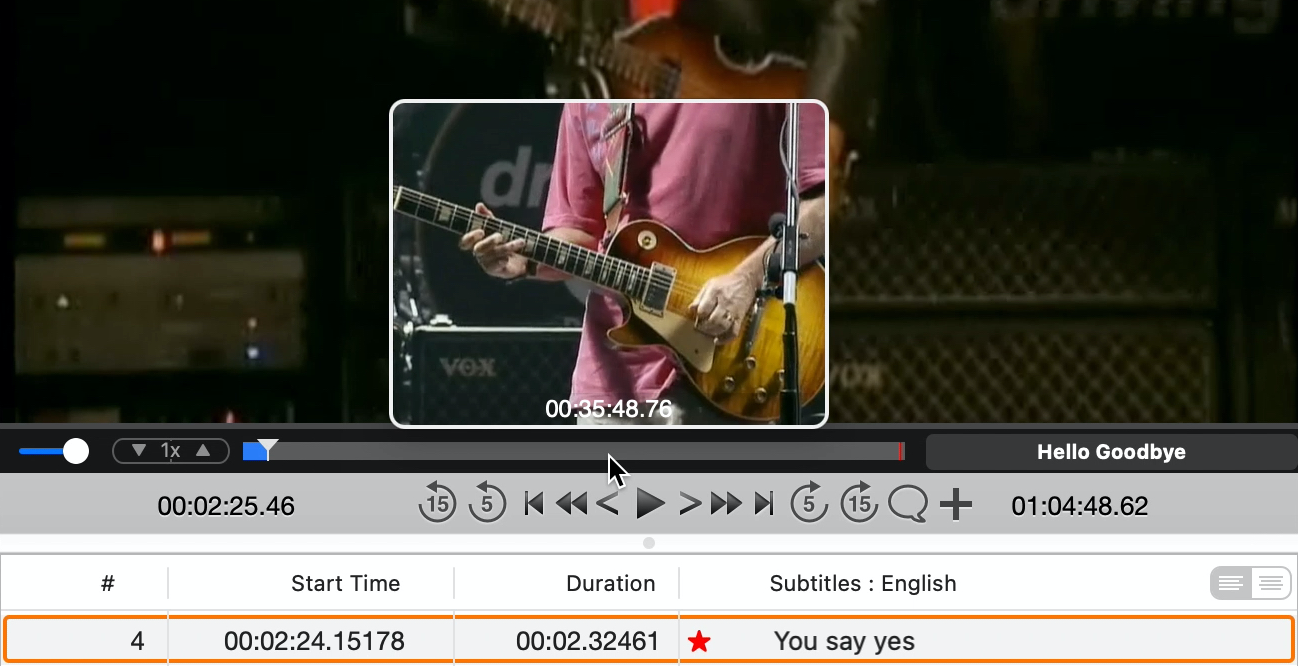
In the following example, the subtitle in row 1, "Hello Goodbye", remains visible for 34 seconds, until 02:24.00000. You can shorten its duration to 4 seconds to leave a subtitle-free gap before the next subtitle, "You say yes."
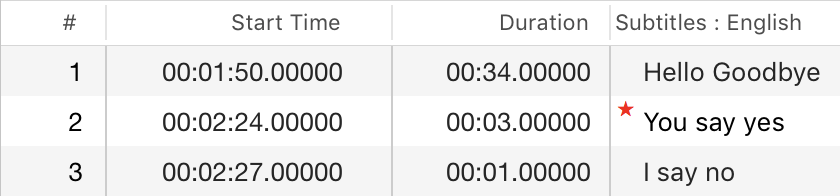
Click the duration field of "Hello Goodbye" in row 1 and change it from 00:34.00000 to 00:04.00000. Once confirmed, a blank subtitle will be automatically inserted to fill the remaining 30 seconds, creating a subtitle-free section as shown below.
Alternatively, move the playhead to 00:01:54.00000, choose Subtitles > Insert Subtitle, and then delete the text to create a blank subtitle manually. This produces the same result.
In the subtitles list, select the subtitle(s) you want to delete, and then press the delete key.
The start time can only be set between the start times of the previous and next subtitles.
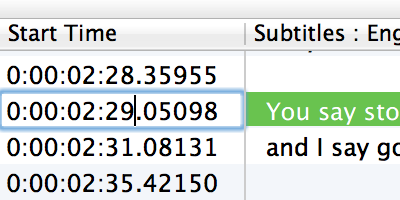
Click the start time of the subtitle you want to change, and enter the new time directly.
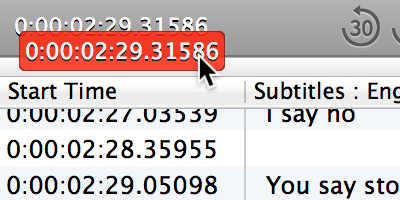
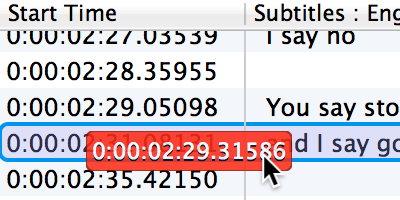
Alternatively, drag the Current Playback Time display and drop it onto a subtitle in the list to update its start time.
Sub-second edits to the "Start Time" or "Duration" are made using the Time Value.
In MOV and MP4 files, time is managed using two values: a Time Value and a Time Scale. Having a general understanding of how these work can be helpful when editing time information. See Time Value and Time Scale for details.
| Clicking the current playback time or video duration display cycles through the following display formats: | ||
| 1. Time Value/Time Scale | 171,488,056/44100 | Shows the actual recorded Time Value and Time Scale. |
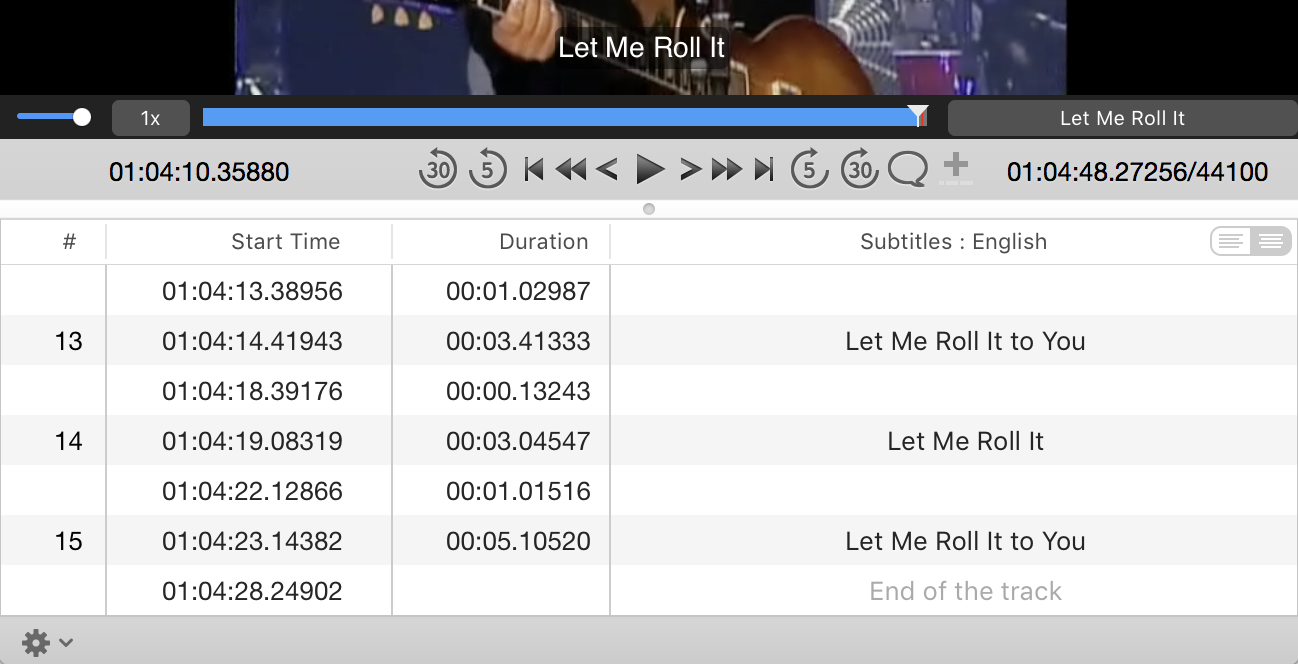
| 2. hh:mm:ss.xxx/Time Scale | 01:04:48.27256/44100 | Shows hours, minutes, seconds, and sub-second values based on the Time Scale. |
| 3. hh:mm:ss.xx | 01:04:48.62 | Shows hours, minutes, seconds, and sub-second values in centiseconds. 27256 / 44100 = 0.6180… → rounded to .62 |
By default, editing the Start Time or Duration of a subtitle does not affect the Start Times of the following subtitles. However, if you hold the Shift key while confirming the change—either by pressing Return or by dragging and dropping the Current Playback Time display—any subsequent subtitles will shift accordingly.

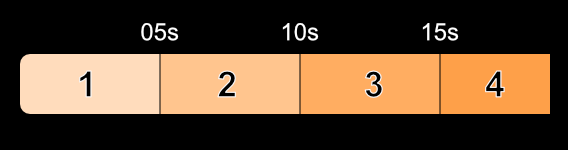
| For Example: Delay the start time of subtitle #2 from 00:00:05.000 to 00:00:08.000 (by 3 seconds). |
| Each method will produce the following result: | |
Standard Edit (without shift key) 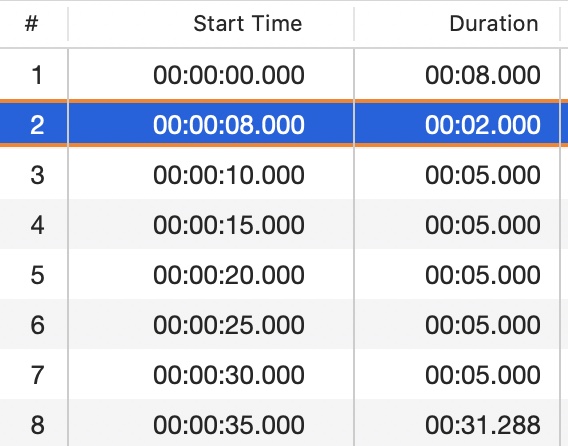
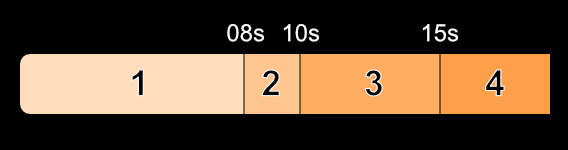 |
Shifted Edit (with shift key) 
 |
If a track end time is set for a subtitle track, you won’t be able to add subtitles beyond that point.
⭐︎ To Set the End Time:
Move the playhead to the point where you want the track to end, then choose Subtitles > Track End Time > Set Current Playback Time.
⭐︎ To Remove the End Time:
Choose Subtitles > Track End Time > Clear, or select "End of the track" in the subtitle list and press the delete key.
You can adjust subtitle track and text display settings in the Inspector panel.
Choose View > Show Inspector, then select the Track tab in the inspector. In the track list, select the subtitle track you want to configure.
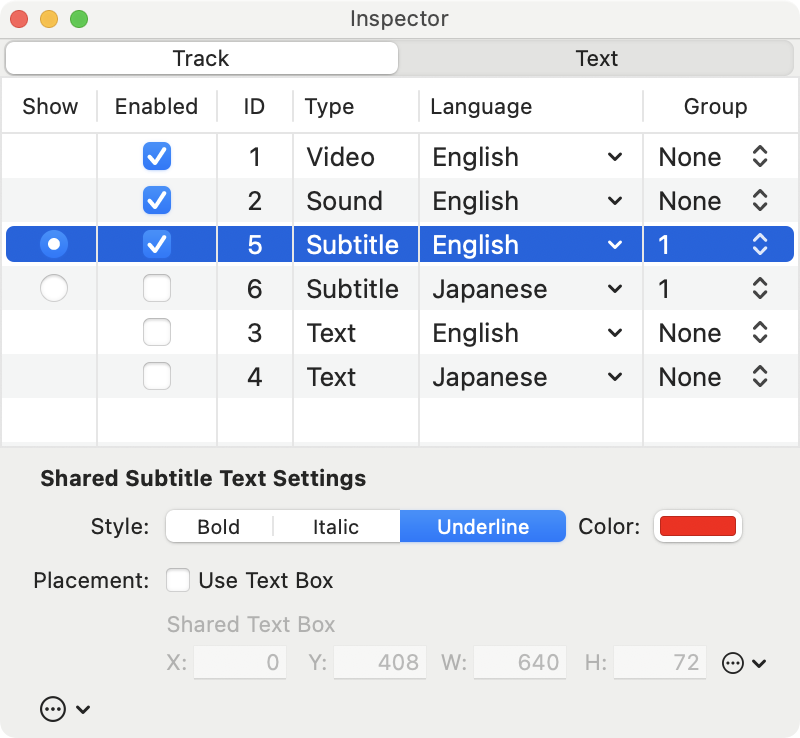
Turn on at least one subtitle track in the subtitle group.
Whether subtitles appear on screen depends on the settings of the video player used for playback.
• Set the target language
• Specify the region (e.g., English (United States), English (United Kingdom))
• Indicate whether the subtitles are SDH (Subtitles for the Deaf and Hard of Hearing)
Assign the subtitle track to the subtitle group. Tracks that are not assigned to it will not function as subtitles.
These settings apply to all subtitle texts within the track. However, if a subtitle has individual settings, those will take precedence.
Set text to Bold, Italic, or Underline.
Note: Italic may not be applied to multi-byte characters.
Set the text color.
Use a Text Box to adjust the placement of subtitles anywhere on the screen.
The “Use Text Box” toggle behaves as follows: • Off: Subtitles are displayed at the bottom of the screen • On: Subtitles are displayed within the specified text box area
Note: Some video players may not support these settings.
You can adjust text display settings for each subtitle individually in the Inspector panel.
Choose View > Show Inspector, then select the Text tab in the Inspector panel. In the main window, select the desired subtitle from the subtitle list.
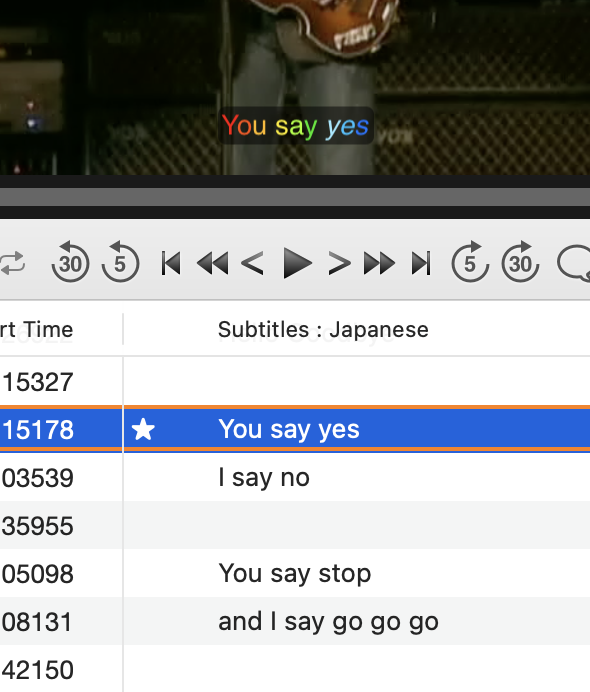

You can apply bold, italic, underline, and text color settings to the entire subtitle text or selected portions.
- Click the Edit Text button to enter edit mode. The button label will change to Done.
- After editing the text or its style, click Done to confirm the changes.
- Subtitles with individual style settings will be marked with a "✭" icon.
When a subtitle has individually assigned style or color settings, it cannot be edited directly in the main window. Use the Inspector panel to make changes.
To revert the individual style and color settings, click the Shared Style & Color button. This will restore the shared style and color settings to the text.
Note: Font and background color settings are not available.
Set the selected subtitle as a forced subtitle.
When a subtitle is forced, an Ⓕ will appear next to its start time in the subtitle list in the main window. In the Inspector’s track list, (F) will be shown if the track contains at least one forced subtitle, and Ⓕ will be shown if all subtitles in the track are forced; such a track is called an "Only-Forced" subtitle track.
Whether or not forced subtitles function correctly may depend on the following conditions:
- Whether the language of the subtitle track matches the language of the audio track
- Whether the language of the subtitle track is listed in the device’s preferred languages (as set in the system settings on Mac, iPhone, iPad, Apple TV, etc.)
- The subtitle settings in the video player (e.g., Subtitles Off, Auto, etc.)
Also, "Only-Forced" subtitle tracks may not appear in the subtitle selection list.
These behaviors may vary depending on the video player.
Use an Individual Text Box to adjust the placement of subtitles anywhere on the screen.
To use individual text boxes, make sure Use Text Box is enabled in the Track tab of the Inspector. Then return to the Text tab and choose Individual Text Box from the Placement pop-up menu.
Subtitles using an individual text box will be marked with a ![]() icon in the subtitle list in the main window.
icon in the subtitle list in the main window.
Note: Some video players may not support these settings.
Use a text box to place subtitle text anywhere on the screen.
To open the text box controls, choose Subtitles > Edit Subtitle Placement..., or simply double-click the screen in the main window. The control panel shown below will appear.
Turn ON the Text Box switch to enable the use and editing of text boxes. Then, the Shared Text Box settings are applied to all subtitles in the track.
To assign a different placement to specific subtitles, select them in the subtitle list at the bottom of the screen (multiple selections are allowed), and choose Individual Text Box from the popup menu.
When one or more subtitles are selected in the subtitle list, a text box appears on the screen as shown below. You can drag it to change its placement or resize it as needed.
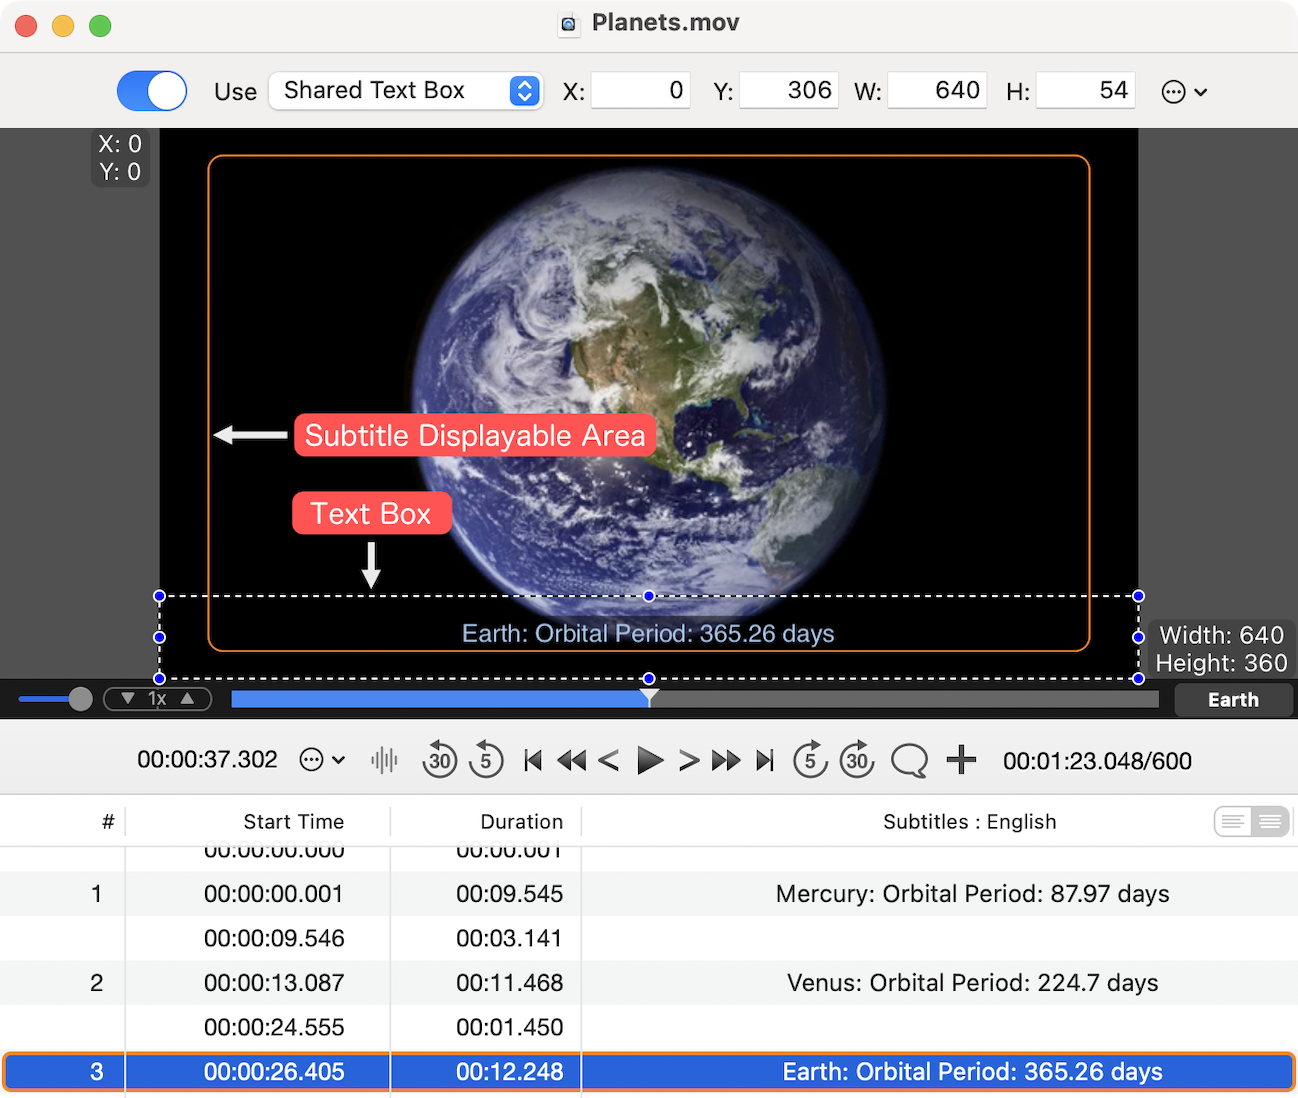
Both the video screen and the Text Box use a coordinate system with the origin at the top-left corner. The Y-axis increases in the downward direction.
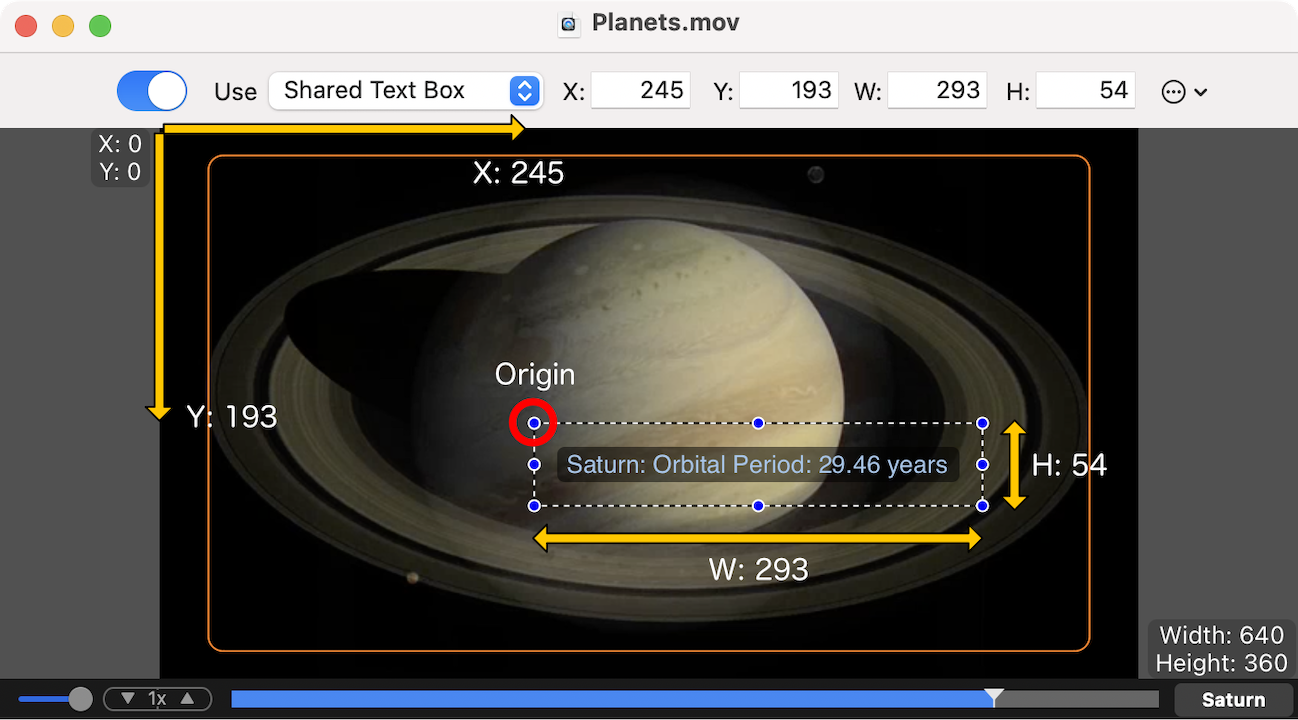
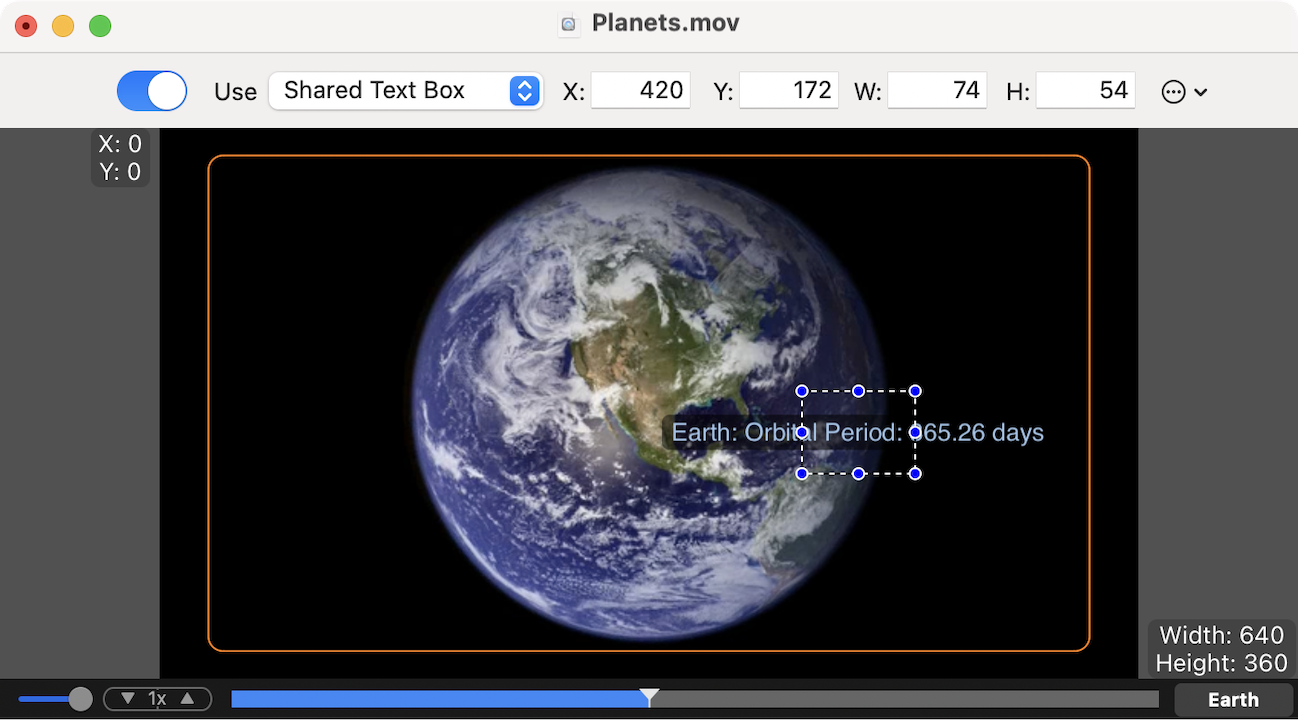
Subtitle text is still displayed even if it extends beyond the Text Box boundaries.
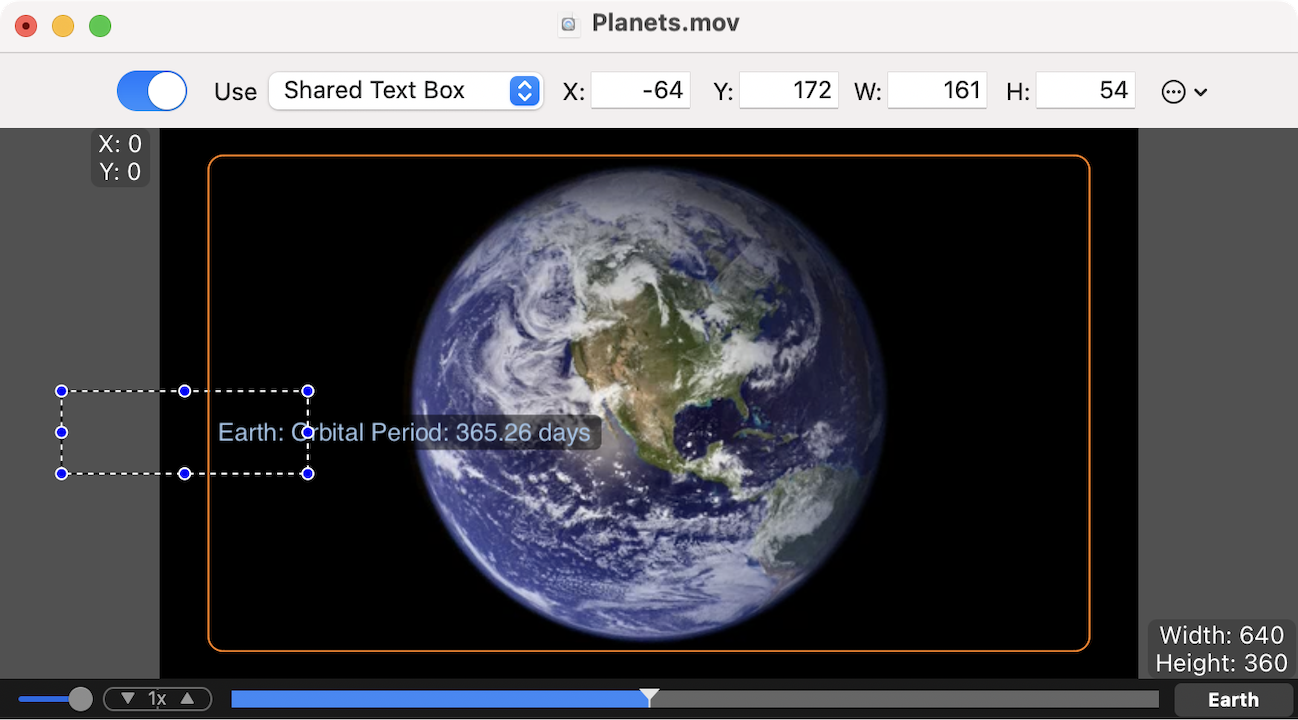
Subtitle text is not displayed beyond the subtitle display area.
Import an SRT file to create a new subtitle track.
Open the target video file, then choose File > SRT > Import... from the menu.
Alternatively, drag and drop the SRT file into the main window.
In the open sheet that appears, select the SRT file to import.
Click the waveform button ![]() , or choose View > Show Audio Waveform.
, or choose View > Show Audio Waveform.
When you place the cursor over the time bar, a preview of the frame at that time appears.
To toggle the preview on or off, Choose View > Time Bar Preview
If you hold down the Shift key while moving the cursor over the time bar, the preview will temporarily do the opposite of the current setting—either hiding or showing accordingly.
To select a portion of the movie, choose Controls > Play Selection Only to display the In and Out selection markers on the time bar. Drag the markers to define the selection. To fine-tune the selection, click a marker to select it, then use the left or right arrow key to adjust its position.
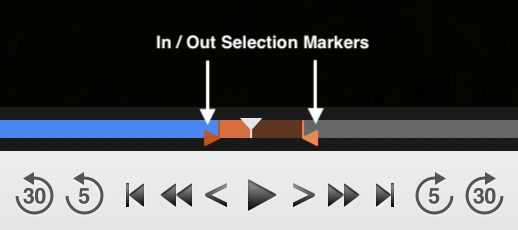
Choose Controls > Clear Selection to remove the selection range. Both the In and Out selection markers will move to the current playback header position, leaving no selection.
| Space bar or return | Play / Pause |
| command (⌘) + ↑ | Go to the beginning |
| command (⌘) + ↓ | Go to the end |
| option (⌥) + command (⌘) + ↑ | Go to the selection start |
| option (⌥) + command (⌘) + ↓ | Go to the selection end |
| ← | Go back one frame |
| → | Go forward one frame |
| command (⌘) + ← | Go back 5 seconds (Default) |
| command (⌘) + → | Go forward 5 seconds (Default) |
| option (⌥) + command (⌘) + ← | Go back 30 seconds (Default) |
| option (⌥) + command (⌘) + → | Go forward 30 seconds (Default) |
| option (⌥) + ← | Go back 1 second (Default) |
| option (⌥) + → | Go forward 1 second (Default) |
| control (⌃) + option (⌥) + ← | Go back 0.5 seconds (Default) |
| control (⌃) + option (⌥) + → | Go forward 0.5 seconds (Default) |
| J | Decrease playback speed |
| K | Normal playback speed |
| L | Increase playback speed |
| M | Reverse play |
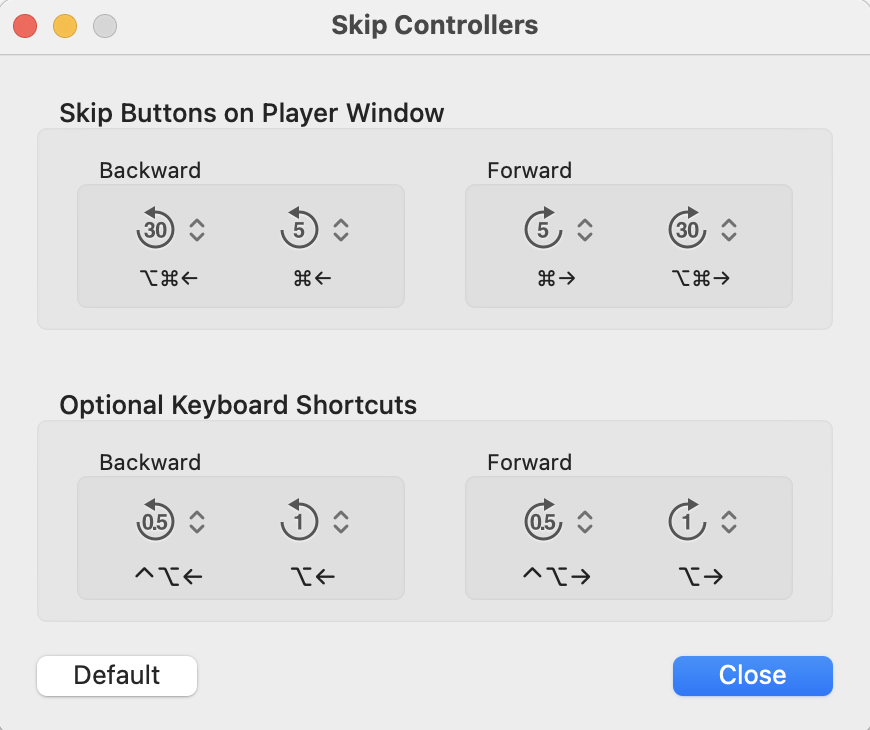
Choose Controls > Customize Skip Times… to open the Skip Controllers window.
You can choose from 0.5, 1, 3, 5, 10, 15, 20, or 30 seconds.
In MOV and MP4 files, time is managed and stored using two integer values: a Time Value and a Time Scale.
The Time Scale represents how many units a second is divided into—in other words, it defines the "temporal resolution" of the file, or how finely one second is split. Each file has its own Time Scale value, which is determined based on factors like the video's frame rate or the audio's sample rate. You cannot change this value.
Time can be calculated using the following formula:
Time Value / Time Scale = seconds
For example:
- If the Time Scale is 600, a Time Value of 1200 equals 2 seconds. A Time Value of 1500 equals 2.5 seconds.
- If the Time Scale is 100, those same Time Values correspond to 12 seconds and 15 seconds, respectively.
Here are more detailed examples:
| Example 1: Time Value: 2,160,000 Time Scale: 600 | ||
| 2,160,000 / 600 | = | 3600 sec |
| = | 60 min | |
| = | 01:00:00.000 | |
| With a Time Scale of 600, the maximum decimal value is .599 | ||
| Example 2: Time Value: 171,488,056 Time Scale: 44100 | ||
| 171,488,056 / 44100 | = | 3888 and (27256/44100) sec |
| = | 64 min 48 sec and (27256/44100) sec | |
| = | 01:04:48.27256 | |
| With a Time Scale of 44100, the maximum decimal value is .44099 | ||
Important:
Sub-second edits are made using the Time Value, not centiseconds. While centiseconds are easier to understand intuitively, converting them to Time Values can introduce rounding errors, which may lead to unintended results.
Video players that support subtitle tracks typically offer a menu that allows viewers to turn subtitles on or off, or to choose the desired subtitle language. Please make sure that subtitle display is not turned off.
In QuickTime Player, go to View > Subtitles > [Your Subtitle Language], or use the subtitles button in the on-screen playback controls to select the desired subtitle.
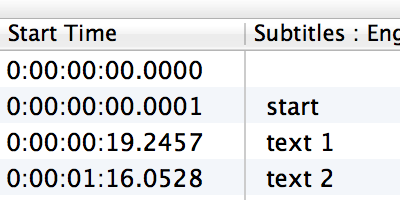
In some cases, subtitles that begin at the very start of the video (00:00:00.0000), such as in Figure 1, may not be displayed.
Figure 1
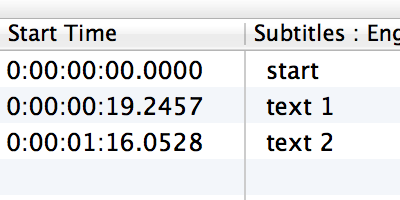
As a workaround, insert a short, empty subtitle at the beginning of the track, as shown in Figure 2.
Figure 2